
More and more people are buying digital products. Selling guides, templates, training, and courses is becoming an increasingly popular way to generate an additional income stream.
If you’re a business owner, chances are you and your team have a wealth of knowledge. Now it’s time to turn that knowledge into something people want to buy. You’ve probably already got a great idea of a digital product to create.
But you’re stuck when it comes to the selling part because the technical bits seem so complicated.
There are so many moving parts to figure out:
- Where to sell it?
- How to accept payments?
- How to deliver it to buyers?
- How to record purchases?
The good news: it doesn’t need to be complex. With the right tools and systems in place, you can successfully sell your digital product.
This article will walk you through the exact steps you need to sell your digital product. It will also give you a walkthrough of selling your product through ThriveCart (which is the answer to all your prayers)!
We'll cover:
- 6 steps to selling your product (from planning to post-purchase)
- Everything you need to know about using ThriveCart
- Setting up the extras: tracking, coupons, additional integrations
Let's get started!!
6 steps to selling your product
First things first. Before you start to sell anything, you’ll need to decide how you will deliver your online product. This will determine what tech you need to use and the entire process going forward.
For a course or a membership, you’ll probably use a platform like Thinkfic, Teachable, Podia, Kajabi, or the newly launched ThriveCart Learn.
If you’re offering a live webinar, you’ll use a video conferencing platform like Zoom or GotoMeeting.
Finally, you can sell a digital file like a PDF template, guide, or an e-book.
Once you’ve decided the format of your product, and have created it, it’s time to sell it.
Here are the steps you need to follow:
1. Planning the sales page
The first thing you need is a page where people can go to buy your product. This is called a sales (or landing) page which is your digital product’s storefront. It’s where you’ll send people to buy your product. You can also promote this page in places like your blog, podcast, emails, and social media.
The sales page can be a part of your website, but can also be a stand-alone page.
There are 3 parts to a landing page:
a. Copy
The copy on the sales page is the most important element. It’s not enough to say “buy my product - it’s great”. You need to convince people of the benefits, prove its value and show them why they can trust you. ActiveCampaign has a great blog post about how to write a landing page that converts. There’s a huge amount of research psychology and science that goes into writing a high-converting sales page (which becomes super important if you’re selling a high-ticket product).
If possible, I’d recommend hiring a copywriter to help you write a convincing sales page.
b. Design
Once your copy is ready, it’s time to design the page. You could just copy and paste your text onto the page. But there’s actually a whole lot of science and strategy to designing a sales page that converts. If you can, use a designer.
If you’re not using a designer, that’s fine too. Just make sure your logo, colors, typography (fonts), and other visual elements on your sales page are 100% consistent with your brand.
Wondering how to keep your branding consistent? Check out this free style guide I’ve created to help you.
c. Tech work
Now the fun begins! (Just me? Oh well...)
The heart of your digital product’s success lies in the technical setup.
People expect a smooth, safe, and speedy buying experience. To do this, you need to use the right tech and processes to handle things like:
- How will people pay?
- What happens after they pay?
- How will you track who buys your product?
- What happens if the payment fails?
- What if a cart is abandoned before the purchase?
There are lots of options of tech you can use to run this part of things. I’ll explain these soon.
Now, I’ll show you where to build the actual sales page as well as explain what to include in it.
2. Building the sales page
You can either:
- Create another page directly on your website.
- Use a dedicated landing page app that lets you design a page and often comes with a built-in payment processor.
There are some great free tools for landing pages. Many DIY site builders and email service providers (ESPs) let you build a webpage (or even a full website) for free, too. There are also some paid tools (such as Unbounce, Leadpages, and Clickfunnels) that will give you many extra features (for a nice fee).
The basics to creating any sales page is to include the customer’s pain points, a product description, pricing, benefits to the user, and testimonials. It’s usually a good idea to build the sales page based on the customer’s level of awareness and readiness to buy.
Make sure to make it clear to the customer what the next steps will be. What will happen after they pay? What can they expect to receive?
When it comes to finding a tool to sell digital products, my Number ONE choice hands down is ThriveCart.
I love ThriveCart because everything is built-in: AB testing, integrations to your ESP, Zapier, webhooks, APIs, payment processing, and more. It takes care of the entire process from end to end and offers (almost) unlimited ability to customize every element of the buying experience.
Apart from being incredibly powerful, ThriveCart is surprisingly easy to use.
You don’t need to know any coding. You can set up everything you need by clicking and dragging. I love it so much that I’ve created a walkthrough of ThriveCart at the end of the article.
3. Link payment processor
Your sales page is built. Now it’s time to link your payment processor so people can pay for your product. Landing page tools can take care of this integration for you. If you’re using WordPress, there are tons of plugins you could use too.
There are quite a few payment processing options out there, such as credit cards, Payoneer, Stripe, PayPal, Square, and Authorize.net. Not all have integration options. And some have higher fees than others.
The flow for the customer should be as smooth as possible, with as few clicks as possible, so as to reduce the number of abandoned carts.
Just be sure to test your setup. Make sure payments are going through properly and invoices are being issued for your customers.
4. Thank you page
Don’t forget to create a thank you page (also called a success page) where buyers will land after they purchase. A thank you page reduces buyer’s remorse and helps your buyer feel excited about their purchase.
Include social proof, testimonials, and other elements to help your buyer feel confident.
The thank you page is also a great place to add more value to your customers. You can also collect more information about them that you can later use for segmentation (use tools like RightMessage or ConvertBox for this).
5. Deliver product
Congratulations! You’ve made a sale. Now you need to deliver the product.
You can either email it directly to their mailbox. Or your thank you page which can include a link to download the file or open up the file directly.
For physical products, you may want to connect with a shipping company to make the process easier for yourself.
If your customers don't have direct access to the product, it's a good idea to email them with the next steps they need to take and what they can expect the process to be.
6. Email nurture sequence
You now have a happy customer! Your sales process has not ended now that they’ve bought. Keep adding value through a drip email sequence.
By nurturing a relationship with your customer, you’ll gain an engaged subscriber who looks forward to learning from you. When the time is right, you can sell them another product or service.
There you have it! The 6 steps you need to sell your product.
Now, since I’m such a fan of the right tech to make your life easier (so you can make more money), I’m going to show you how to set up and sell your product in ThriveCart.
How to sell your digital product with ThriveCart
ThriveCart is incredible because it has ALL the features you’d ever need in an online shopping cart. Every single step of the process - from creating the landing page, setting up ESP triggers, to accepting payments and delivering your product - takes place directly in ThriveCart. It integrates wonderfully with other tools and is so intuitive to use.
It’s extremely powerful, easy-to-use, and customizable. It lets you sell in almost any way you can think of. What I love most is how ThriveCart gives you complete control over the customer buying experience.
Let’s go through a typical ThriveCart setup.
1. Create & name your product

Create your product on ThriveCart
Here you’ll name your product and define what type of product it is - physical or digital.
I love how there are three modes: test, live, and disabled. Test mode lets you see exactly how the process works without taking actual payments. This is your creation sandbox.
2. Set up pricing options
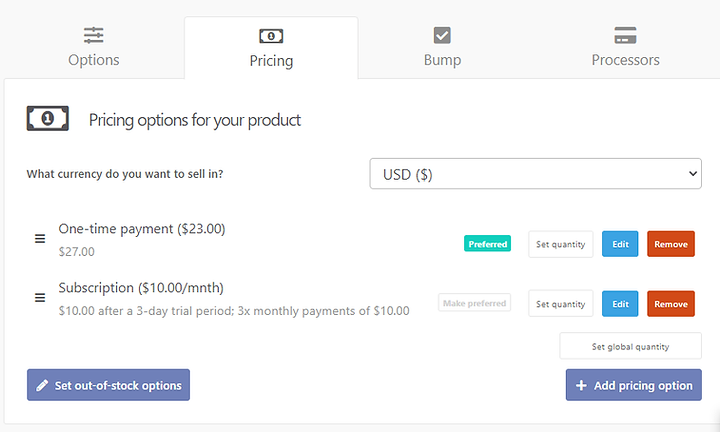
Setting up pricing options in ThriveCart
This is one area where ThriveCart really excels. If you can think of a payment option, ThriveCart can do it. The sky is the limit.
Here’s what’s possible:
- One-time fee
- Multiple payment plans (split-pay)
- Subscriptions / memberships
- Name your price (great for crowdfunding or donations)
- Free trial period (remember that if you offer a trial period, send a reminder email before the trial runs out)
- Limited product quantity (if you only have limited stock or limited space in a course, or if you want to create scarcity, even when there is none)
- Expiration date (for limited time offers)
- Automatic sales tax
- Support for 22 currencies (though it only allows one currency per product)
Heads up: If you have a Pro account, sales tax is automatically calculated. If you don’t want to upgrade to a Pro account (which isn’t that much more expensive), I recommend exporting the data to Google Sheets, doing the tax calculation there, and then sending it to your accounting software. (Using a Zapier integration, of course.)
Optionally, you can create a bump offer to add to your sales. Later in the process, you can create upsells and downsells as well
3. Connect to payment processing
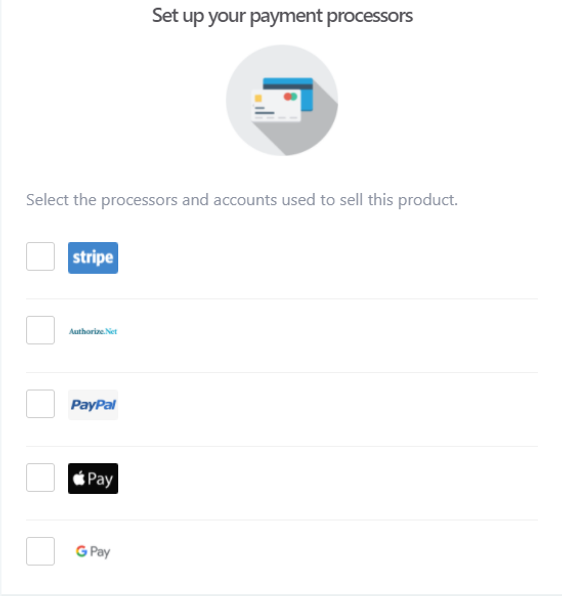
Setting up payment processing in ThriveCart
Now it’s time to choose how you want people to pay you. Hit the Set up processors button and choose how you want to accept payments.
ThriveCart works with PayPal, Stripe, Google Pay, Apple Pay, and authorize.net.
Remember, the more payment options you provide, the easier it is for visitors to buy.
Once you’ve selected your payment options, connect your account and you’re set to go.
4. Define product fulfillment
After you set up payment, you need to define the fulfillment path for your product. You can direct them to a URL, add them to your membership site, or send them an email. You’ll also need to enter an email or URL for support if they have an issue.
5. Create your sales page
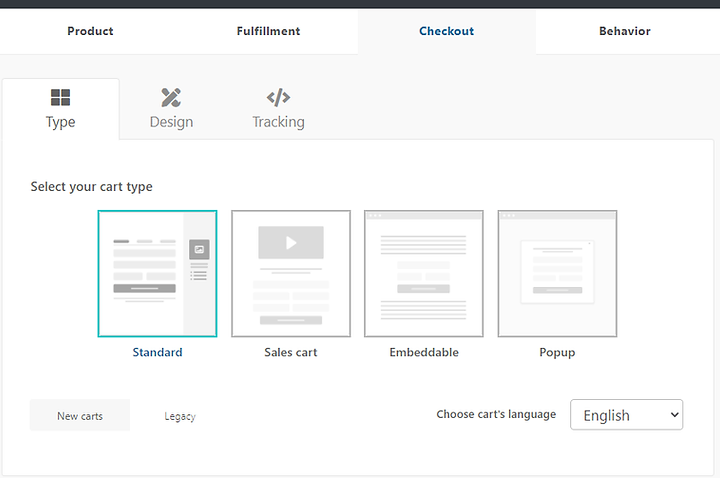
Create your sales page in ThriveCart
Now you’ve set the foundations, it’s time to create your sales page. What I love about ThriveCart is how flexible the design is.
There are 4 shopping cart options so you can present your shopping cart in multiple ways:
Standard — The typical order form page
Sales Cart — A landing page and shopping cart combined into one
Embedded — Add a checkout form to an existing website page that allows HTML integration
Popup — A button-click popup order form
ThriveCart lets you set up your page exactly how you want. You can create a design for one product, and reuse it later for other pages.
All the elements are on the right, and you drag and drop them on the page. Your fonts, colors, backgrounds, and form definitions are on the left. While fonts are limited, you can add custom HTML to work around that.
You’ll also build your checkout form here. ThriveCart lets you choose how little or how much information about a customer you collect at the checkout.
You need to collect the customer’s email address, but you can also collect things like their name, business name, address (with variations), phone number, and even custom information.
While I’m not a fan of asking for too much information at checkout (it often reduces conversion), if you do collect key information during checkout, later on, you can define rules and triggers based on all these variables.
Remember: however you choose to design your page, make sure to stay consistent with your style guide and your visual branding.
6. Define checkout process and other parameters
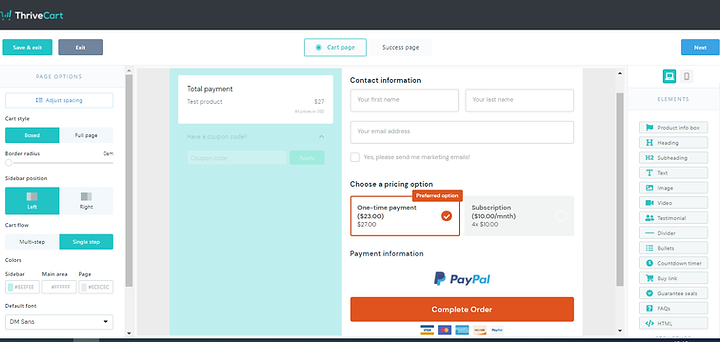
ThriveCart page editor
You’ll decide whether you want a single-step or multistep checkout.
This is a process decision and should be based on the customer journey you want to give your customers.
It also depends on how many pricing and payment options you have. Too many can make the landing page cluttered and reduce conversions.
The designer gives you many options and makes this tool totally customizable for your needs.
7. Thank you/Success page
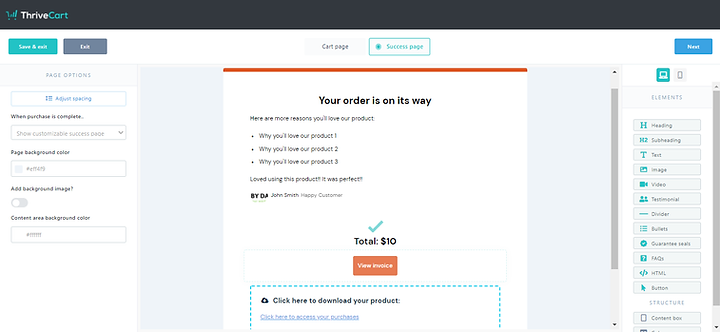
Setting up success page in ThriveCart
Your success page (also called a thank you page) is the final step of your customer journey. It’s where they get their confirmation of their order and everything they’ve purchased.
In ThriveCart you can:
- show your customer an invoice/total breakdown of their purchase
- provide them with a URL to their download or access their product
- redirect to a custom success page (such as a page on your website).
You can also set an expiration date for the URL so it only lasts for a limited period of time.
Remember to include a thank you message to make them feel confident about their purchase. And if possible, testimonials from happy customers.
8. Add tracking

Adding tracking and custom code to ThriveCart
It’s super easy for you to incorporate the tracking links into ThriveCart.
If you need to install tracking codes for platforms like Google Analytics, Facebook Pixel, or your ESP (like Active Campaign), you can add it here and then trigger a workflow that will give your customers a positive experience.
Remember the limited fonts? Use the tracking code options to add your brand fonts via CSS if they don’t exist natively in ThriveCart.
9. Define next steps based on behaviors
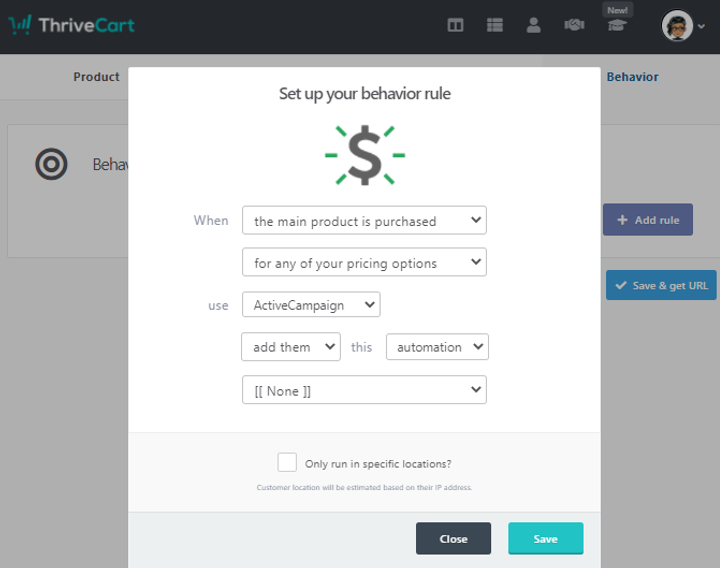
Defining behaviors in ThriveCart
ThriveCart is great when it comes to triggers. This, I think, is one of my favorite features.
Once your page is set up, you can define what happens next based on your customer’s behavior (or location).
For example, if a cart is abandoned mid-purchase, you can trigger an email from your ESP. If a payment is declined, another email could be sent. There are endless ways to use triggers, like tagging your customers in your ESP for segmentation, adding them to a Google Sheet, sending a certain email.
It makes your life so much easier - and will help you sell more products - when everything is automated.
10. Bring on the coupons
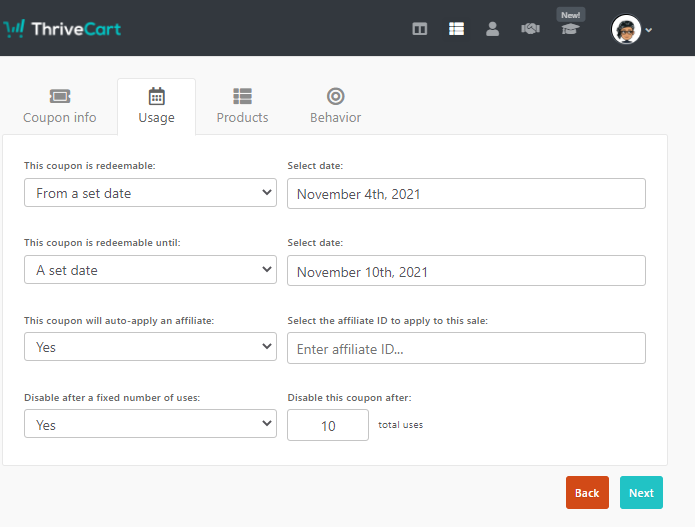
Creating coupons in ThriveCart
Everyone loves coupons! Coupons are one of the most exciting parts of purchase for a customer and are a great incentive to purchase.
You can set any coupon permutation in ThriveCart including start date, expiration date, limited amounts, discount percentage, specific products and so much more.
You can also define targeted rules. For example, if they use a certain coupon code, you can automatically add them to a certain sheet or trigger an email to be sent to them via your ESP.
Plus, and this is a favorite of mine, you can define if you want to enable customers to add their coupons in directly, or if you want to hide the field, and build the coupon code into your URL.
11. Add more integrations
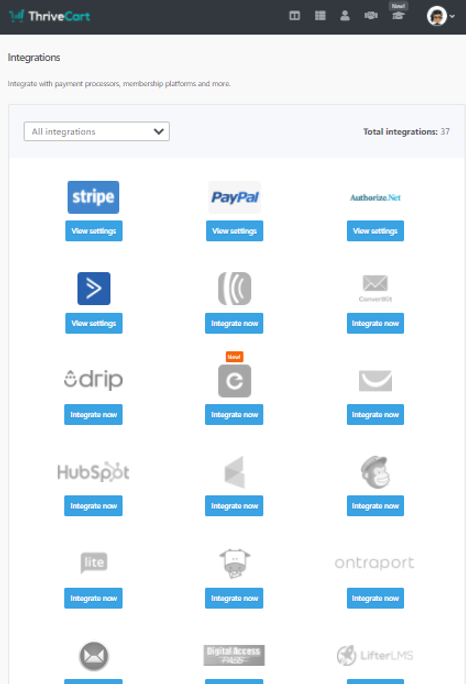
ThriveCart integrations
You can integrate ThriveCart with almost anything from your ESP and Slack to Google Sheets and membership sites. You can do this with ThriveCart’s built-in integrations. And if it doesn’t exist there, you can always use Zapier for your integration.
This gives you complete control over the buying experience and helps you create the ideal flow for your customer.
To access the integrations, click on your profile picture (top right) > select Settings > select View Integrations
12. ThriveCart Learn

Creating a lesson in ThriveCart Learn
When I thought ThriveCart couldn’t get any better, this happened:
ThriveCart just launched a brand new feature. At no additional costs (I still can’t get over that!), ThriveCart Learn is a course platform like Thinkific or Teachable.
(I'll add an article about it at some point.)
It offers all the integration we talked about, plus all the features of a course platform. If you’re launching an online course, this is off-the-charts useful as a single tool to run your course.
Lastly, how much does ThriveCart cost?
ThriveCart usually costs $99/month. At the moment (October 2021), they’re running a special. For $495 you get LIFETIME license to ThriveCart today, and never pay ongoing fees again!
If you’re going to be offering any sort of digital products in the future, this is one of the best investments you can make and will pay for itself over and over again. (Other similar products charge a monthly fee or/and a commission.)
There you have it!
Everything you need to sell your digital product. Now, go forth and sell!
Drop me an email and let me know how it worked out for you.
Can't be bothered to set this up yourself? Too complex for you? I've got you covered. Let's chat.
Note: this article contains affiliate links. The opinions expressed are my own. It costs you nothing extra to use these links. I just make a bit of cash on the side so I can continue to do this research 😉. And I only recommend tools I highly believe in and have used myself.


